

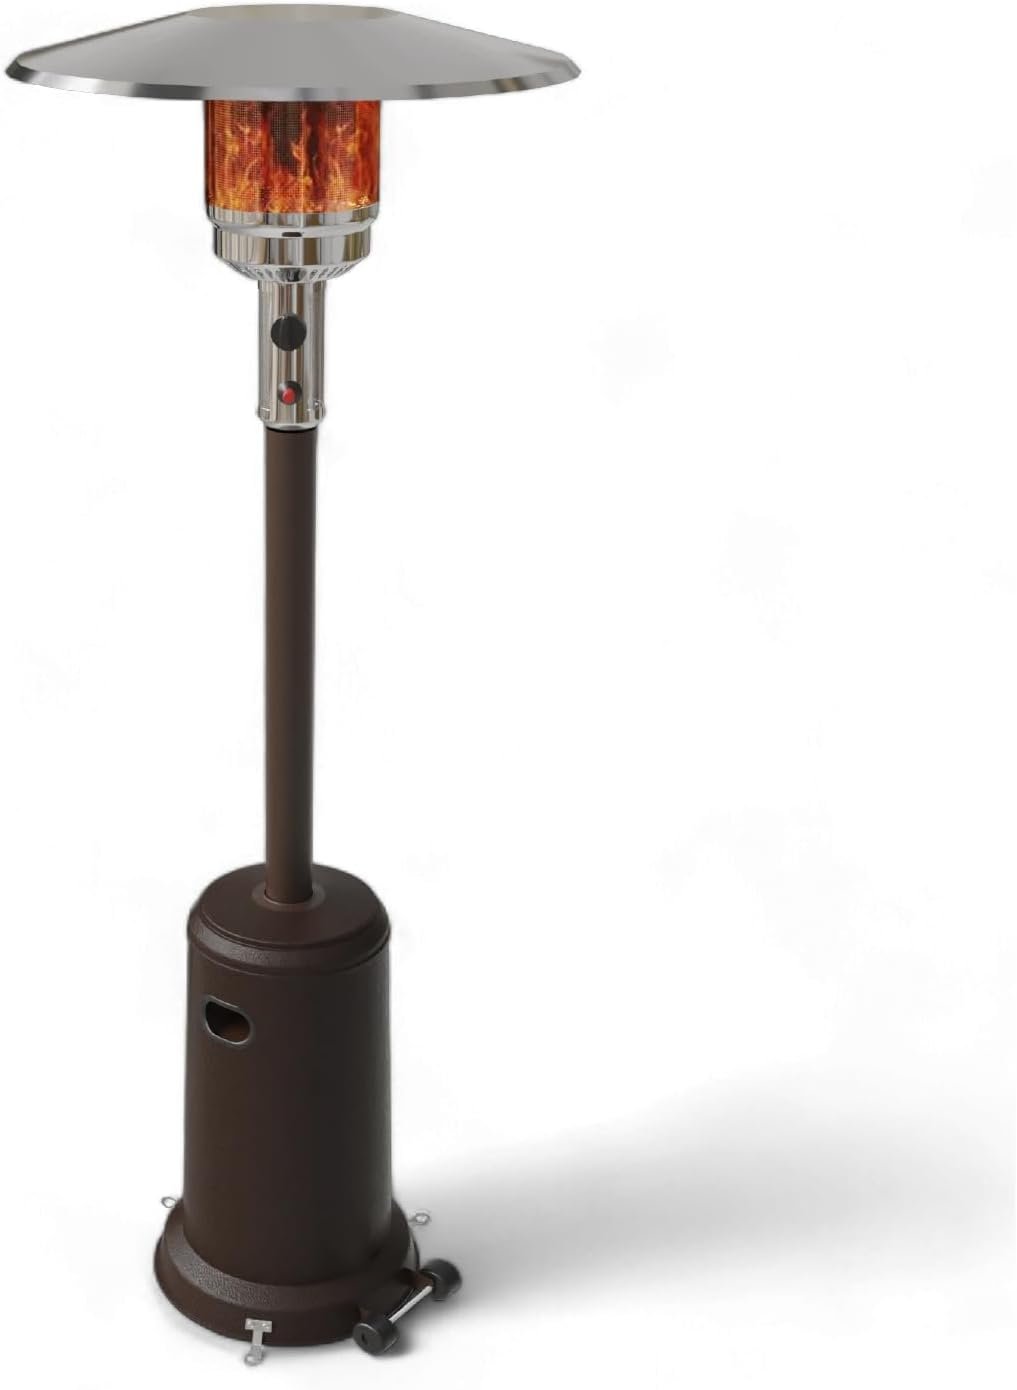
Amazon Basics 46,000 BTU Outdoor Propane Patio Heater with Wheels, Commercial & Residential, Slate Gray, with Water Tank, 32.1 x 32.1 x 91.3 inches (LxWxH)
$129.99


Amazon Basics 46,000 BTU Outdoor Propane Patio Heater with Wheels, Commercial & Residential in Slate Gray. Minimum heater clearances from combustible materials can be found in the user manual found on this page.
SOOTHING WARMTH: Outdoor gas heater for cozy warmth when sitting outside; ideal for cafes, restaurants, and home patios
EASY TO USE AND MOVE: One-touch ignition button for quick start ups; wheels for maneuvering into place
POWERFUL HEAT: 46,000 BTUs for heating up to a 9 foot radius; adjustable temperature knob for controlling the output
SAFETY FEATURES: Tilt safety auto-shut off valve; water box for weighing down the base and wheel kit; chain included to secure the tank
DURABLE EXTERIOR & REQUIRES: Powder-coated finish in Slate Gray for lasting strength; 20 pound liquid propane gas tank to operate (not included)
PRODUCT DIMENSIONS: 32.1 x 32.1 x 91.3 inches (LxWxH)
13 reviews for Amazon Basics 46,000 BTU Outdoor Propane Patio Heater with Wheels, Commercial & Residential, Slate Gray, with Water Tank, 32.1 x 32.1 x 91.3 inches (LxWxH)


Katelyn –
Worth it!
I bought on a whim because it was a deal of the day and I am so glad I did! Where we live it could be 40 degrees one day and 80 the next so its nice to be able to be warm on our deck during the colder days. It doesnt have a gigantic heat radius but works for what we need it to! Glad I came across it!
Debjani Lahiri –
Patio perfection
I’m loving my outdoor patio stand heater! It provides warm and cozy heat on chilly evenings, making my patio a year-round gathering spot. The design is sleek and sturdy, and it’s easy to move around to direct the heat where needed. The heat output is perfect for small to medium-sized areas, and it’s energy-efficient too. Highly recommend for anyone looking to extend their outdoor living season!
Argelis G. –
LEGIT
We used this during the winter and were very satisfied with the purchase. Kept our entire outdoor sitting area warm. Works very well.
Hisierrabob –
No instructions so you’re on your own!
There are no instructions other than an exploded view & parts list, so if you’re handy it should be OK?It is fairly easy to assemble!
excavator –
Great deal
Can’t beat it for the price anywhere!
Julie C. –
Works great, looks great, somewhat easy assembly
Pull everything out of the box. Make sure you get the hardware packet out. Have someone start peeling off the blue protective tape from the 4 pieces that attach together as well as the very top piece b/c this process is tedious and time-consuming. In taking off the blue film, use small motions around the edges to get it going. Get a socket set and screw driver. Then, only attach the four curved metal pieces together, into a big circle, using the outside holes b/c you’ll then attach the very top piece to it using the inside holes. The very top piece goes “bowl” down.Order:1. wheels onto base2. 3 curved rods attach to the base. The curved tops point at each other (facing in). I now put the 20 lb gas tank onto the base.3. lower pipe triangle attaches to the top of the 3 curved rods4. upper pipe attaches to heater unit after feeding gas line down down the upper pipe5. circle, with very top cover (bowl down) now attached, attaches to heater unit with 3 double-threaded screws.6. Take out the 4 existing screws from the top of the lower pipe. You’ll use these again to attach the whole upper part of the heater to the lower half of the heater.7. feed the gas line from the bottom of the upper pipe down through the lower pipe so that it comes out by the gas tank.8. screw it onto a 20 lb. lp tank.9. after opening the tank valve and turning the unit dial a 1/4 turn counter-clockwise and holding it in, push the igniter button. It ignites pretty quickly but you have to keep pushing the dial in for a few more seconds to get a good gas flow.Hope this helps!
M. Tanner –
Assembly instructions grossly inadequate!
Where to begin…. First, I guess, a disclaimer: I have assembled the unit, but haven’t yet turned it on, so this review is based on my “assembly” experience.The first thing you’re supposed to do is disassemble the base unit from its housing & fill it with sand or water. I chose water because I live in rural Vermont & don’t have access to sand.Once you complete that, you’re instructed to reattach the collar to the base unit using the four screws & bolts you previously removed to take the it apart. Easy enough, right? Except that when you tighten them, you must be real careful. After the reassembly, there was water all over the floor, BECAUSE THE NUTS WENT RIGHT THROUGH THE BOTTOM OF THE BASE. Furthermore, there was absolutely no reason to take the base apart – you can fill it while it’s together.I probably should have stopped & asked for a return at that point, but the shipping carton arrived in deplorable condition, & there was no way I would have been able to put it back in the box.Next problem – Step3 (& I have read & reread the assembly instructions to see if I messed this up) is for the attachment of the “Post Supports.” WHAT THEY DON’T EXPLAIN IS THAT THEY ARE NOT IDENTICAL! TWO HAVE SMALL HOLES ON THE UPRIGHTS THAT ARE NEEDED IN (GET THIS) STEP 11, BASICALLY THE LAST STEP OF THE ASSEMBLY PROCESS! IF YOU DON’T PUT THE ONE POST WITHOUT THE SMALL HOLES IN BETWEEN THE OTHER TWO, YOU’LL HAVE TO TAKE THE ENTIRE UNIT APART TO REPOSITION THEM CORRECTLY AFTER YOU THINK YOU’RE DONE!In Step 9, there is no guidance in which side of the REFLECTOR PIECES the CAP NUT should be secured to (how the screw & nut should be inserted). I took a chance & attached them to the bottom – hope I’m right….At NO POINT in the instructions do they tell you to attach the UPPER POST (F) to the LOWER POST (G), but I’m just being picky here – that’s kind of easy to figure out.In Step 11, you are instructed to put your propane tank “on top of the “Post Supports.” This is an obvious mistake, as it the tank sits on the base BETWEEN the Post Supports. Then you’re asked to “SECURE THE PROPANE TANK BY ATTACHING THE CHAIN (L) TO THE POST SUPPORTS.”AT THIS POINT, I HAD TO TAKE THE UNIT APART AND REPOSITION THE POST SUPPORTS TO BE ABLE TO ACCOMMODATE THE DAMN CHAIN, & THEN REASSEMBLE IT!Hope this is useful should you decide to purchase this item.
Dave Neuman –
Long lasting
We have two of these for 9 years and they still work as well as the first day we got them
JK –
I really like how easy this was to put together. I did it all by myself, even with my long finger nails. lol…I can not believe how much heat it projects outwardly (4-5 feet comfortably) ….My deck party was a hit with this to keep my guests warm. It made the fall weather feel more like a summer evening. I must say that I would recommend this product based on fantastic price, fast delivery time, and works great. It is quite heavy duty as well. I did not have to fill the base with sand or water and it stood up right in quite windy weather the following day after my party. Buy it you wont be disappointed.
Adnerb –
Love it. The only criticism is it stands crooked. Too much effort to send back and it doesnât affect the way it performs so we are keeping it
Stephen CameronSmith –
Only used three times so far so not a long track record. Easy to start. Gives off pretty good heat when not windy. Useless in a wind. Unfortunately heat goes up so not very efficient. Need to fill base with sand to add weight so will no chance of tipping over. Wheels allow the unit to be tilted and moved around. Only way you can mover it safely. Would recommend a cover to keep clean and water out when not using. Would I buy again. Yes.
H.G. –
I live in the frigid northeast on the Atlantic – our summer sucks. This bad boy not only brightened up the deck with some fun colour, but also gave us enough heat to be outside past 6 pm! As per other reviews, this unit is extremely tall. Too tall if you’re sitting or under 6′. We followed another reviewer’s advice and cut off a full foot from the centre beam. Only took a few minutes, but you will definitely need the right cutting/grinding tool.
M –
Very easy to put together. Throws off a lot of heat. Looks really nice as well. Only thing that was hard was removing that blue protective coating.